

")
GST Registration for Ecommerce Sellers in India — Complete Step-by-Step Guide (2026)
If you’re planning to sell on Amazon, Flipkart, Meesho, or any online marketplace in India — GST registration is not optional.
India’s ecommerce market is projected to grow from roughly ₹10.8 lakh crore today to nearly ₹30 lakh crore by 2030 — and as that scale has grown, regulators have systematically tightened compliance around it. Unlike offline businesses, where GST only kicks in once your turnover crosses a threshold (₹40 lakh for goods in most states), online marketplace sellers are required to register for GST from their very first sale. Even if your monthly revenue is ₹5,000. Even if you haven’t shipped a single order yet.
This is one of the most commonly misunderstood rules in Indian ecommerce, and it catches thousands of new sellers off guard. Get it wrong, and the consequences go beyond inconvenience — failure to register when legally required attracts a penalty of ₹10,000 or 10% of the tax due (whichever is higher), and cases involving intentional evasion can be penalized up to 100% of the tax due, on top of marketplace delisting and blocked payouts.
This guide covers everything you need to know: why GST is mandatory for marketplace sellers, the rare exemption that actually exists (and why it barely applies to anyone scaling), exactly what documents you need, a step-by-step walkthrough including the newer biometric verification step, what TCS means for your payouts, the post-registration “Rule 10A” trap that silently suspends accounts, and the most common mistakes to avoid.
What Is GST — and Why Does It Matter for Online Sellers?
GST (Goods and Services Tax) is India’s unified indirect tax system, introduced in 2017 to replace a patchwork of older taxes including VAT, excise duty, central sales tax, and service tax. It applies to the sale of most goods and services across India at rates ranging from 0% to 28%, depending on the product category.
For online sellers, GST matters for three reasons:
1. Legal compliance. If you supply goods or services through an e-commerce operator like an online marketplace, you must register for GST regardless of your annual turnover. This is not the same rule that applies to your local kirana store — the ecommerce-specific rule is stricter and has no turnover floor.
2. Marketplace access. Most reputed online marketplaces require sellers to be GST-registered to sell on their platforms. Without a valid GSTIN linked to your seller account, your account either won’t be activated or will be suspended.
3. TCS deduction. E-commerce operators collect TCS at 1% of the seller’s taxable sales value and deposit it with the government. Sellers can later claim this as Input Tax Credit (ITC). For this mechanism to work, every seller needs an active GSTIN — without one, the TCS has nowhere to be credited.
The Normal Threshold (And Why It Doesn’t Apply to You)
For context, here’s the standard GST registration threshold that applies to offline businesses under Section 22 of the CGST Act:
| Business Type | Turnover Threshold for Mandatory Registration |
|---|---|
| Suppliers of goods (normal category states) | ₹40 lakh |
| Suppliers of goods (special category states) | ₹20 lakh |
| Service providers (normal category states) | ₹20 lakh |
| Service providers (special category states) | ₹10 lakh |
These thresholds exist precisely to shield small businesses from compliance overhead. But Section 24 of the CGST Act carves out specific categories — including anyone supplying through an Electronic Commerce Operator (ECO) — and makes registration compulsory regardless of these thresholds. This overrides Section 22 entirely for marketplace sellers.
Why the Government Designed It This Way: The TCS Mechanism in Detail
The government can’t realistically audit millions of fragmented online sellers individually. So the law shifts the burden of transaction visibility onto the marketplace itself, under Section 52 of the CGST Act.
Here’s the exact mechanism: the ECO (Amazon, Flipkart, Meesho, etc.) is legally required to deduct 1% TCS on the net value of taxable supplies made through its platform — split as 0.5% CGST + 0.5% SGST for intra-state sales, or 1% IGST for inter-state sales. The platform then files a monthly return in Form GSTR-8, which maps the deducted tax directly to each seller’s individual GSTIN.
Worked example: if you sell ₹1,00,000 worth of goods on Amazon in a month, the platform deducts ₹1,000 as TCS, pays you ₹99,000, and deposits the ₹1,000 with the government against your GSTIN — which you can later claim back as Input Tax Credit.
Without a GSTIN, this entire mechanism breaks down — the platform has nowhere to map the deducted tax. This is the exact reason major marketplaces flatly refuse to onboard unregistered sellers; it isn’t platform policy, it’s a structural requirement of how the law was written.
Is GST Really Mandatory — Even at Zero Sales?
Yes. Completely.
Section 24 of the CGST Act has no minimum turnover exception for marketplace sellers. The normal threshold exemption of ₹40 lakh (goods) or ₹20 lakh (services) does not apply to ecommerce sellers. Zero turnover threshold — even if you sell ₹1 worth of goods on Amazon or Flipkart, GST registration is mandatory. This applies to all sellers on all platforms.
Why did the government design it this way? Marketplace platforms are required to collect 1% TCS on every payment to sellers and report it. For that system to work, every seller needs an active GSTIN. Without it, the TCS has nowhere to go and the whole transparency mechanism breaks.
The practical consequence: If you create a seller account on Amazon or Flipkart without a valid GSTIN, your account activation will be blocked. If you somehow get past initial setup without it, your payouts will be held until a valid GSTIN is linked. Either way — no GST, no selling.
What About Inter-State Sales?
Even a single inter-state shipment triggers mandatory registration. There is no turnover exemption for inter-state supply. Since most ecommerce businesses ship nationally, this condition alone makes registration compulsory.
In other words: if a customer in Delhi buys your product and you’re based in Mumbai — that’s inter-state. GST registration is required from that very first order. Since most ecommerce inherently relies on nationwide shipping to maximize reach, this condition alone makes registration compulsory for nearly every online seller — there’s no practical way to “stay exempt” while shipping pan-India.
What Happens If You Don’t Register
The penalties are not symbolic. Operating without mandatory registration attracts a baseline penalty of ₹10,000 or 10% of the tax amount due, whichever is higher. Where the assessing officer finds intentional fraud or gross negligence, the penalty can escalate to 100% of the tax due — alongside permanent loss of B2B customers, marketplace delisting, and forfeiture of any accumulated Input Tax Credit.
The One Exemption That Exists — And Why It Barely Helps Anyone Scaling
There is technically a narrow exemption from mandatory GST registration for very small online sellers, introduced by the CBIC via Notification No. 34/2023-Central Tax, effective October 1, 2023. It’s worth knowing about — mostly so you understand why it won’t apply to you if you’re serious about growing.
The exemption permits certain suppliers selling through an ECO to skip registration, but only if every single one of these conditions is met simultaneously:
| Exemption Condition | What It Actually Means |
|---|---|
| Strictly intra-state operations | You cannot make a single inter-state sale — every buyer must be in your home state |
| Single-state ECO limitation | You cannot use the marketplace to supply goods in more than one state or union territory |
| PAN-based enrolment | You need a valid PAN and must declare your business address on the GST portal to get a unique “Enrolment Number” (not a full GSTIN) |
| Turnover ceiling | Your turnover must stay within the standard exemption thresholds (e.g., ₹40 lakh for goods) in both the preceding and current financial year |
Why this is practically unworkable for most sellers: the moment you breach the turnover threshold, or the marketplace’s algorithm processes even a single inter-state order (which most fulfilment networks do automatically, by design, to maximize your reach), the enrolment number is instantly invalidated and full registration under Section 25 becomes mandatory immediately.
Modern marketplace algorithms are built around centralized fulfilment centers and pan-India visibility — they actively work against staying “single-state.” For any seller with real growth ambitions, this exemption is a technicality, not a strategy. Formal GST registration remains the only realistic path forward.
Before You Register: What You Need to Know First
Your Business Structure Matters
Before applying for GST, you need to know what type of business entity you are — because the registration is linked to your business structure. Most new sellers start as a Sole Proprietorship (your personal PAN is your business PAN). If you haven’t decided on your structure yet, read our guide to Proprietorship vs LLP vs Pvt Ltd first.
Choose the Right Registration Type
For most new ecommerce sellers, there is one type of GST registration to apply for: Regular Taxable Person. This is the standard registration that gives you a GSTIN, allows you to collect GST from customers, claim Input Tax Credit (ITC) on purchases, and fulfill TCS requirements for marketplace payouts.
There is also a Composition Scheme — available to businesses with turnover up to ₹1.5 crore (₹75 lakh in special category states), offering a simplified flat tax rate and quarterly filing (Form CMP-08) instead of monthly returns. It sounds appealing, but it’s fundamentally incompatible with how ecommerce actually works:
- Composition dealers cannot make inter-state outward supplies — a dealbreaker the moment you ship pan-India
- They cannot collect tax directly from customers
- They are severely restricted in operating through ECOs at all
- Most critically, they are prohibited from claiming Input Tax Credit (ITC)
That last point is the real cost. Ecommerce relies heavily on B2B input services — platform commissions, logistics fees, warehousing, digital advertising — nearly all of which attract 18% GST. Without the ability to claim ITC on these substantial operational expenses, your margins erode significantly. For this reason, virtually every serious ecommerce seller registers as a Regular Taxpayer, not under Composition — even though it means monthly/quarterly GSTR-1 and GSTR-3B filings instead of a simpler quarterly statement.
The FBA/Multi-State Warehouse Issue
Registering with just your home state GSTIN and then enrolling in pan-India FBA creates a compliance gap that’s expensive to fix retroactively. If you store inventory in multiple states, including through marketplace warehouses, you must obtain separate GSTIN registration in each state where you have a place of business. Stock transfers between your own warehouses across states are treated as inter-state supply.
What this means practically: If you use Fulfilled by Amazon (FBA) and Amazon stores your inventory in warehouses across India, you may need GST registration in each state where Amazon has your inventory. Platforms typically notify you when this becomes necessary as you scale — but it’s worth knowing upfront so it doesn’t surprise you.
Using a Virtual Office for Multi-State GST Registration
Once you need a GSTIN in a second (or third, or fourth) state purely to support a marketplace warehouse, leasing actual commercial office space in each state is rarely practical or affordable. This is where the Virtual Office (VPoB — Virtual Place of Business) model has become standard practice across Indian ecommerce.
A virtual office gives you a government-accepted commercial address in that state — without requiring you to actually rent or occupy physical workspace. It’s typically used in one of two ways:
| Classification | How It’s Used |
|---|---|
| Principal Place of Business (PPoB) | Your primary registered location — useful for remote sellers, drop-shippers, or digital-first founders without a physical office anywhere |
| Additional Place of Business (APoB) | A secondary location tied to your existing GSTIN — this is what most sellers use to formally add a marketplace warehouse to their registration |
Documentation matters a lot here, and scrutiny is high. Tax officers routinely reject weak virtual office paperwork, so make sure your provider supplies:
- A notarized Rent or Lease Agreement valid for at least 12 months
- A formal No Objection Certificate (NOC) on the provider’s official letterhead, explicitly permitting GST registration use
- A recent utility bill proving the provider’s own ownership or leasehold rights over the building
Generic, undated, or month-to-month NOCs are a common rejection reason — insist on proper documentation from your virtual office provider before filing.
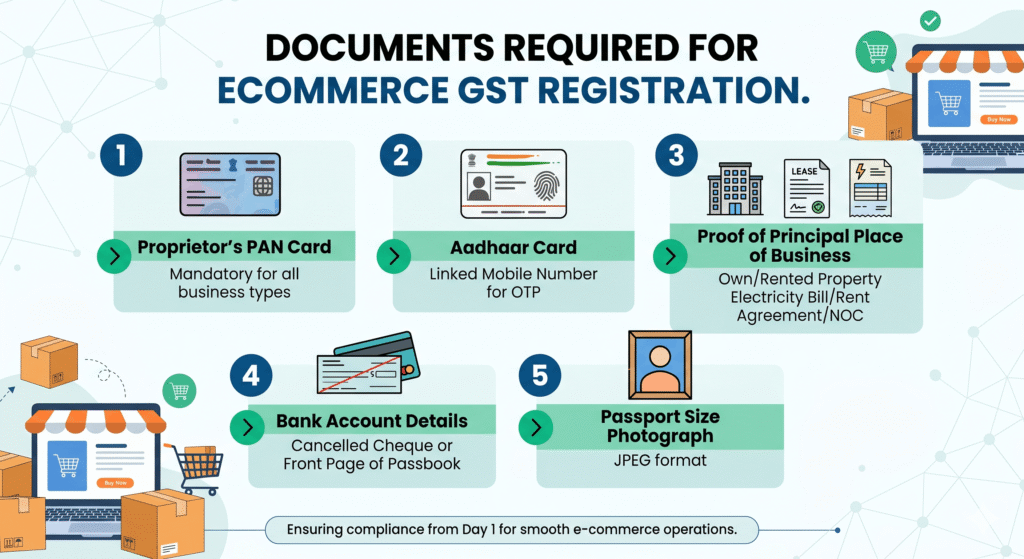
Documents Required for GST Registration
For most individual sellers, you need a PAN, Aadhaar, photo, address proof, bank proof, and business address documents such as a rent agreement or an electricity bill.
Here is the complete list:
For Sole Proprietorship (Most Common for New Sellers)
| Document | Details |
|---|---|
| PAN Card | Your personal PAN (also serves as business PAN for proprietors) |
| Aadhaar Card | Must be linked to your mobile number for OTP-based verification |
| Photograph | Passport-size photo of the proprietor (JPG, under 100 KB) |
| Proof of Business Address | Any one: electricity bill, rent agreement, property tax receipt, or NOC from owner (if working from home, electricity bill of the residence is accepted) |
| Bank Account Proof | Cancelled cheque showing account number and IFSC, or first page of bank passbook, or bank statement (must be in your name) |
| Mobile Number + Email | Linked to Aadhaar for OTP; used for all future GST communications |
For Partnership / LLP
Additional documents needed:
- Partnership deed or LLP agreement
- PAN of the LLP
- Consent/authorization letter from all partners
- PAN and Aadhaar of all designated partners
For Private Limited Company
Additional documents needed:
- Certificate of Incorporation
- Memorandum of Association (MoA) and Articles of Association (AoA)
- PAN of the company
- Board Resolution authorizing the signatory
- PAN and Aadhaar of all directors
Important: Document Quality Matters
In 2026, the GST portal uses AI-assisted document verification — low-quality scans get flagged automatically. Ensure all documents are:
- Clear, well-lit photographs or high-resolution scans
- Not blurry, cropped, or partially visible
- In acceptable file formats (JPG/PDF, typically under 1 MB per file)
- Consistent — the name on your PAN, Aadhaar, and bank account should all match
A mismatch in names across documents (e.g., “Mohammed Irshad” on PAN vs “M. Irshad” on the bank statement) is one of the most common causes of application rejection or delays.
Premise Verification — What Actually Proves You Have a Valid Business Address
Beyond identity documents, the GST portal requires unambiguous proof of lawful possession of your business premises. The exact document depends on how you hold the property:
- Owned premises: property tax receipt, municipal khata copy, or a registered sale deed, paired with a recent electricity bill
- Rented/leased premises: a legally binding rent agreement paired with a utility bill (electricity, water, or internet) not older than two months
- Virtual office: the NOC + rent agreement + utility bill triad described in the section above
Officers check these closely — an electricity bill that’s three months old, or a rent agreement that doesn’t match the address you’ve entered elsewhere in the form, is a common reason for delay.
Step-by-Step: How to Register for GST Online
GST registration is done entirely online through the official government portal at gst.gov.in. There is no government fee for registration. Some sellers use a CA or consultant to handle the process for a service fee — this is optional but can save time, especially if you’re unfamiliar with government portals.
Here is the complete process:
Step 1: Go to the GST Portal and Start a New Registration
- Visit gst.gov.in
- Click Services → Registration → New Registration
- Select Taxpayer as the type of taxpayer
- Choose your State and District
- Enter your Legal Name exactly as it appears on your PAN
- Enter your PAN number — the system will auto-verify it
- Enter your Email ID and Mobile Number (linked to Aadhaar)
- Complete the captcha and click Proceed
Step 2: OTP Verification
- You will receive separate OTPs on your mobile number and email
- Enter both OTPs to verify
- Once verified, a Temporary Reference Number (TRN) is generated and sent to your email and mobile
Critical: After completing Part A, you have exactly 15 days to complete Part B before your TRN expires. If you miss it, the entire application resets and you start from scratch. Set a reminder and complete Part B immediately.
Step 3: Log in With Your TRN and Complete Part B
- Go back to gst.gov.in → Services → Registration → New Registration
- Select Temporary Reference Number (TRN) and enter your TRN
- Complete OTP verification again
- You will now see the full GST REG-01 application form — this is Part B
Step 4: Fill in Business Details
The application has multiple sections. Fill each carefully:
Business Details:
- Trade name (the name your business operates under — can differ from your legal name)
- Constitution of business (Proprietorship, Partnership, LLP, Pvt Ltd, etc.)
- Date of commencement of business
- Reason for registration (select “Liability to register under section 24” for marketplace sellers — this covers the mandatory ecommerce provision)
Principal Place of Business:
- Full address of your main business location
- Upload your address proof document here
- Select the nature of possession (owned / rented / others)
Additional Place of Business (if applicable):
- Add any warehouse locations, especially if you’re using marketplace fulfilment services
Step 5: Add Your Goods/Services and HSN Codes
This step requires you to mention the types of goods you sell and their HSN (Harmonized System of Nomenclature) codes.
Important: Wrong HSN codes: choosing a broad or incorrect HSN code for your products doesn’t just affect your tax rate — it creates downstream mismatches in every GSTR-1 you file. Spend 10 minutes on the HSN code finder before submitting.
You can find the correct HSN code for your product using the HSN search tool on the GST portal or by asking your CA. Common examples:
- Clothing and apparel: Chapter 61/62
- Footwear: Chapter 64
- Food products (packaged): Chapter 19-21 (varies by product)
- Cosmetics and personal care: Chapter 33
- Electronics: Chapter 84/85
Step 6: Upload Bank Account Details
- Enter your bank account number and IFSC code
- Upload a cancelled cheque or bank statement as proof
- The name on the account should match your PAN name
Step 7: Add Signatory Details and Upload Photograph
- Enter the details of the authorized signatory (for proprietors, this is you)
- Upload your passport-size photograph
- Enter your PAN and Aadhaar details
Step 8: Verification and Submission
- Review the entire application carefully before submitting
- Choose your verification method:
- DSC (Digital Signature Certificate) — required for companies and LLPs
- EVC (Electronic Verification Code) — OTP sent to your Aadhaar-linked mobile; available for proprietors and individuals
- Submit the application
Step 9: Track Your Application and Receive GSTIN
- After submission, an Application Reference Number (ARN) is generated
- If all details match and no biometric verification is triggered, the GSTIN is usually issued within 3 to 7 working days
- The GSTIN and registration certificate (Form GST REG-06) are sent to your registered email
- You can also download the GST registration certificate from the portal under Services → User Services → View/Download Certificates
Note: Many applications in 2026 are now flagged for mandatory biometric verification before the GSTIN is issued — this is a significant shift from purely remote registration. We cover exactly how this works, and the strict deadline involved, in the next section. Don’t skip it.
Decoding Your GSTIN — What the 15 Digits Actually Mean
Once issued, your GSTIN isn’t a random number — every digit has a specific meaning, which is genuinely useful to understand for reconciliation and logistics planning:
| Position | Meaning | Example |
|---|---|---|
| Digits 1–2 | GST State Code — identifies your taxing jurisdiction | 27 = Maharashtra, 29 = Karnataka, 07 = Delhi |
| Digits 3–12 | Your 10-digit PAN — links your GST profile to your income tax profile | ABCDE1234F |
| Digit 13 | Entity code — number of registrations you hold within that state | 1, 2, or up to Z |
| Digit 14 | Default character, always assigned as ‘Z’ | Z |
| Digit 15 | Checksum digit for error detection | A computed digit |
If you ever need a second GSTIN in another state (for an FBA warehouse, for example), it will share your PAN digits but carry a different state code at the start — this is normal and expected.
The Biometric Verification Shift — What to Expect If You’re Flagged
One of the most significant changes to GST registration in the 2025–2026 framework is the move away from a purely remote, OTP-based system toward physical Biometric Aadhaar Authentication for higher-risk applications, governed by Rule 8 of the CGST Rules.
Why This Exists
This wasn’t introduced to inconvenience genuine sellers — it’s a direct response to large-scale Input Tax Credit (ITC) fraud. Bad actors had been using stolen, purchased, or synthetic PAN and Aadhaar combinations to register fake shell businesses, which then issued fraudulent invoices and passed on ITC that was never backed by real goods or services. Biometric verification closes this gap by confirming the person registering is physically real and matches the UIDAI database.
Is Every Applicant Required to Do This?
No. The GSTN’s risk-scoring algorithm evaluates each application after Part B is submitted. Low-risk profiles can often complete registration remotely via standard Aadhaar OTP, exactly as described in the steps above. Higher-risk or flagged profiles are routed into mandatory physical biometric verification.
What Happens If You’re Flagged
You’ll receive an intimation email with a secure link to book an appointment at a designated GST Suvidha Kendra (GSK).
Critical deadline: you must complete this GSK visit within 15 days of submitting Part B. Miss this window, and your TRN lapses — the ARN is never generated, and you have to restart the entire application from scratch.
At the GSK appointment, the Primary Authorized Signatory (and any Promoters, if required) must bring original documents — Aadhaar card, PAN card, address proofs, and the TRN printout. The operator will:
- Physically verify your original documents against the uploaded copies
- Capture all ten fingerprints
- Conduct a dual iris scan
- Take a live photograph
This data is matched in real time against the UIDAI database. Once verification succeeds, the ARN is generated automatically and your application moves into the regular officer review queue — the same 3–7 working day timeline applies from that point.
Practical advice: if you receive a biometric verification request, don’t delay. Book the earliest available GSK slot, bring originals (not just photocopies) of every document, and double-check that the address and name details on your physical documents exactly match what you entered on the portal.
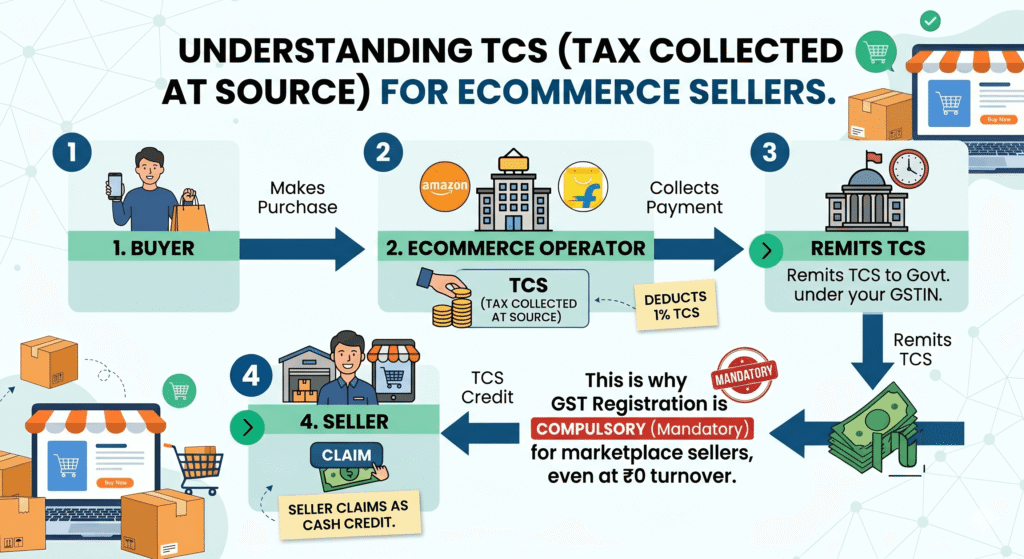
Understanding TCS: What Happens to Your Marketplace Payouts
Once you’re registered and selling on a marketplace, you’ll notice that your payouts are slightly less than your gross sales. This is because of TCS — Tax Collected at Source under GST.
Here’s how it works:
- E-commerce operators are required to deduct TCS at 1% (0.5% CGST + 0.5% SGST) on the net taxable value of all sales made through their platform.
- This 1% is deducted from your payout and deposited by the marketplace (Amazon, Flipkart, Meesho, etc.) directly with the government against your GSTIN
- You can see this reflected in your seller dashboard as a deduction
Is TCS a Cost or a Credit?
TCS is not a final cost to you — it is a credit. The amount deducted is reflected in your Electronic Cash Ledger on the GST portal and can be:
- Claimed as Input Tax Credit (ITC) against your GST liability
- Or claimed as a refund if your ITC balance is higher than your tax liability
In practical terms: if you sell ₹1,00,000 worth of goods on Amazon in a month, Amazon deducts ₹1,000 as TCS and deposits it against your GSTIN. When you file your GST return for that month, you can offset this ₹1,000 against whatever GST you owe on those sales.
TDS Under Income Tax (Section 194O) — Different From TCS
There is also a separate TDS (Tax Deducted at Source) under income tax that applies to ecommerce transactions:
- Section 194O deducts TDS at 0.1% when a resident seller’s e-commerce sales cross ₹5 lakh and PAN or Aadhaar is furnished. Without PAN or Aadhaar, TDS is 5% from the first rupee.
- This is separate from GST TCS and is reflected in your Form 26AS (income tax statement)
- You claim it as a credit when filing your annual income tax return
Ensure your PAN is always correctly linked to your marketplace seller account — a missing or incorrect PAN results in 5% TDS instead of 0.1%, a significant cash flow hit.
If the Officer Has Questions: Form REG-03 and Field Verification
Not every application sails through cleanly. If the assessing officer spots discrepancies — an ambiguous virtual office NOC, a blurry document, a mismatched address — they’ll issue a Show Cause Notice in Form GST REG-03. You then have exactly 7 working days to respond with clarifications or alternate documents via Form GST REG-04. Respond properly and registration typically proceeds.
In some cases, even after biometric clearance, the officer may still order a physical field verification of your premises — this extends the approval timeline up to 21 working days. This is uncommon for straightforward applications but worth knowing about if your registration is taking longer than the standard week.
The Rule 10A Trap: Why Your GSTIN Can Get Auto-Suspended Right After Approval
This is arguably the most overlooked compliance step in the entire registration journey — and the one most likely to silently damage a new seller who assumes the process is “done” once the GSTIN is issued.
What Rule 10A Actually Requires
Bank account details used to be collected during the initial application. That changed — to speed up onboarding, the GST portal now requires you to add your bank account details after your GSTIN is generated, not during the application itself.
Under Rule 10A of the CGST Rules, newly registered taxpayers are legally required to furnish their operational bank account details on the portal within 30 days of receiving registration, or before filing their first GSTR-1/IFF — whichever comes first.
The Consequence of Missing This Window
If you let the 30-day window lapse without linking a bank account, the GST portal’s automated systems auto-suspend your GSTIN — no manual officer review, no warning call, just an automatic system action.
For an ecommerce seller, an auto-suspended GSTIN is genuinely severe:
- You’re immediately barred from filing GSTR-1, which breaks the ITC chain for any B2B buyers
- Amazon, Flipkart, and other marketplaces run continuous automated API checks on seller GSTIN status — a suspended GSTIN typically triggers immediate delisting and frozen payouts
- E-way bill generation for any inter-state stock transfer is completely blocked, which can paralyze your fulfilment operations if you use FBA-style warehousing
This single missed step — adding your bank details — can undo every other part of the registration process you’ve already completed correctly.
How to Add Your Bank Details (And How to Reverse a Suspension)
Go to Services → Registration → Amendment of Registration (Non-Core Fields) → Bank Accounts tab. A single GSTIN can hold up to 10 bank accounts.
Enter the account number, account type, and IFSC code (validated in real time by the portal), then upload proof of ownership — a clear image of a cancelled cheque with your business name pre-printed, the first page of your bank passbook, or a certified bank statement. Submit using DSC or EVC.
The good news if you’ve already been suspended: successfully completing this process automatically reverses an auto-suspension triggered by Rule 10A non-compliance — no manual application or officer intervention needed. The moment your bank details are validated, the suspension is lifted.
Set a calendar reminder the day your GSTIN is approved. Don’t wait for a deadline — add your bank account details within the first few days, before this becomes a problem at all.
After Registration: What You Need to Do
Getting your GSTIN is step one. Once registered, here are your ongoing responsibilities:
GST Return Filing
Once registered, you can access ITC and comply with regular GST filings like GSTR-1, GSTR-3B, and GSTR-9.
At a basic level for most small ecommerce sellers:
| Return | Frequency | What It Covers |
|---|---|---|
| GSTR-1 | Monthly (11th of next month) or Quarterly (for smaller sellers under QRMP) | Details of all outward supplies (sales) you made |
| GSTR-3B | Monthly (20th of next month) or Quarterly | Summary of sales, ITC claimed, and net tax payable |
| GSTR-9 | Annually (31st December of next year) | Annual reconciliation of all returns filed |
Nil Returns: Even if you made zero sales in a month, you must file a nil return for GSTR-3B. Missing this leads to late fees (currently ₹20/day for nil returns, ₹50/day for non-nil returns) and can eventually lead to GSTIN suspension.
For a full guide on how to file GST returns as a beginner, read our article: GST Returns Filing for Beginners — What, When, and How Often.
Issue GST Invoices for Every Sale
Every B2B transaction requires a proper GST invoice with your GSTIN, the buyer’s GSTIN, HSN codes, applicable tax rates, and the tax amount shown separately. For B2C sales on marketplaces, the marketplace typically handles invoice generation — but ensure your settings are configured correctly in your seller dashboard.
Link Your GSTIN to Every Marketplace Account
Log in to your seller accounts on Amazon, Flipkart, Meesho, and any other platform and ensure your GSTIN is correctly entered and verified. Without this:
- TCS cannot be credited against your GSTIN
- Your payouts may be held
- Your account may be flagged for compliance review
Common Mistakes to Avoid
1. Entering the wrong HSN code. This causes downstream mismatches in every return you file and can trigger notices. Verify your HSN code before submitting the application.
2. Business address doesn’t match documents. If you’re operating from home, the address on your electricity bill or rent agreement must match what you enter in the application exactly.
3. Name mismatch across documents. PAN, Aadhaar, and bank account must show the same name. Even minor differences (full name vs initials) can cause delays.
4. Missing the 15-day TRN window. After generating your TRN in Part A, you must complete Part B within 15 days or the application expires and you start over.
5. Filing nil returns late. Even months with zero sales require a nil GSTR-3B by the 20th. Late fees add up quickly.
6. Not updating GSTIN when converting from proprietorship to Pvt Ltd. When you change your business structure, your PAN changes, which means your old GSTIN is invalid and a new one must be registered. Many sellers miss this and continue using an invalid GSTIN for months.
8. Missing the Rule 10A bank account deadline. This is the newest and most commonly missed step in 2026. Add your bank account details within days of getting your GSTIN — don’t wait for the 30-day deadline to approach.
9. Weak virtual office documentation for multi-state registration. Generic or undated NOCs get rejected. If you’re using a virtual office for an APoB, insist on a notarized 12-month agreement and a proper NOC on letterhead.
Don’t Forget State-Level Taxes — The Professional Tax Layer
GST gives you a unified national framework, but it doesn’t replace certain state-level taxes that run in parallel. The most common one that catches new ecommerce sellers off guard is Professional Tax, applicable in major ecommerce hubs including Maharashtra, Karnataka, and Telangana.
In Maharashtra specifically, getting a GSTIN or starting commercial operations triggers an obligation to register under the Professional Tax Act, 1975 — and this compliance splits into two distinct registrations:
| Registration | Who Needs It | Cost |
|---|---|---|
| PTEC (Professional Tax Enrollment Certificate) | The business entity itself, its directors, partners, or self-employed proprietors — mandatory regardless of whether you have employees | Flat ₹2,500/year to the state government |
| PTRC (Professional Tax Registration Certificate) | Only required if you employ staff earning more than ₹7,500/month | You deduct tax from employee salaries (e.g., ~₹200/month) and remit it via monthly/annual returns |
For a solo ecommerce seller in Maharashtra with no employees: PTEC is a strict requirement alongside your GSTIN — don’t skip it just because you’re a one-person operation. PTRC only becomes relevant once you start hiring salaried staff.
If you’re registered in a different state, check whether a similar professional tax obligation applies locally — rules and rates vary by state.
The Bottom Line
GST registration is the single most important compliance step for any ecommerce seller in India — and the one where “I’ll do it later” causes the most damage. Your marketplace account, your payouts, your TCS credits, and your legal standing all depend on it.
The good news: the process is fully online, the government fee is zero, and for a straightforward proprietorship, most sellers complete it in under two hours with the right documents in hand.
The sequence to follow:
- Decide your business structure (read our guide)
- Get Udyam/MSME registration (free, takes 10 minutes — read the guide)
- Apply for GST registration (this article)
- Open your business current account using your GSTIN and PAN
- Register on marketplaces and link your GSTIN
Once GST is done, you’re legally equipped to sell. Everything else — branding, packaging, listings, your own website — builds on top of this foundation.
Next step: Once your GST is registered, get your Udyam/MSME registration immediately — it’s free, takes minutes, and gives you a 50% discount on trademark fees. Read: Udyam Registration — Free Step-by-Step Guide
About This Article
This article is for general informational purposes and reflects the GST framework in India, including Rule 8 (biometric authentication) and Rule 10A (bank account furnishing) of the CGST Rules, as understood in early 2026. GST rules, rates, exemption notifications, and portal processes are subject to change by the GST Council and CBIC. Always verify current requirements on the official GST portal (gst.gov.in) and consult a qualified Chartered Accountant (CA) for advice specific to your situation.
")
")